Packing my S&S hard case with my
S&S coupled 56cm bike
I have been asked numerous times about packing my bike into an S&S hard case. On my last trip, I went ahead and took pictures of the pertinent stages of packing. I also describe some of the more subtle things that I’ve learned after packing it over a hundred times. In this note, I’m packing a custom Ti bike whose geometry is roughly equivalent to a 56cm frame. It also has rim brakes. I have a similarly sized Ti gravel frame with cable actuated disc brakes. I have not yet packed that bike into this case. Below is how I do it.
Since every frame has a different geometry, this guide may require some modification for any other bike to fit. After traveling with my bike for about 12 years, I can safely say that what I will describe below is robust and repeatable for this bike.
1. Step 1: Uncouple the bike and cables, and remove:
a. Wheels & skewers
b. Pedals
c. Saddle and seat post. Leave saddle connected to seat post and mark a Sharpie line around the seat post so that you know where to tighten it when you reassemble.
d. Bottle cages
e. Chain
f. Fork. I have a threadless fork and this removal makes the packing process infinitely easier.
g. Front brake
h. Rear derailleur. I do this for extra safety. Not necessarily needed.
2. Step 2: Add padding to all frame members

3. Step 3: Place TSA cargo net on the bottom of the case. Make sure all of the “ears” will be accessible for the top of the clam shell when it’s time to add it.
4. Step 4: Place Front Triangle in the case. I have found that the placement of this is critical to an easy pack, and incorrect placement leads to an impossible pack.
a. The handlebar will be against the right side of the case, so the front triangle needs to be placed such that the drops on the bars will just clear it on the right and left side.
b. Note that the handlebars are still connected to the front triangle thru the brake and derailleur cables.
5. Step 5: Place the rear wheel (cassette down) on top of the front triangle. The cassette should just barely touch the padding on the front triangle. If there is any metal-on-metal contact between the wheel and front triangle, add some padding to the interface.
a. Note that these are 32mm tubeless tires. They are on the max edge of fitting into the case. The pressure needs to be really low to get them stuffed into the case. I haven’t broken the bead yet on the rear wheel, but the front wheel is a much bigger challenge. More on that below.
b. When I was running 28mm tires with tubes, I had zero issues getting the wheels/tires to fit easily into the case.
6. Step 6: Place the handlebars thru the spokes on the rear wheel with the brake levers compressed. The brake levers need to be compressed so that the handlebar can sit as low as possible in the case. You may also need to rotate the rear wheel slightly to allow the drops to fit between the spokes while allowing the bar to touch the right side of the case. I was able to pack the bike similarly when I was running 32 spoke wheels.
a. Note that I have a Velcro pad around the wheel where the brake lever contacts it. This will keep the lever from scratching/denting your wheel.
b. My front brake (removed from the fork) is Velcro’ed to the wheel so that it doesn’t bang around during transport.
7. Step 7: Pre place bottoms of the compression members (white disks) at locations where it looks like they will be most needed. These will likely move slightly as you add more components. My frame pump is also in there in case I need it when I arrive at my destination.

8. Step 8: I place my tools, pedals and chain under the wheel wherever they best fit. It’s easier to do it now than after all the components are in the case. I put them in bags so that the metal doesn’t bang around during transport.
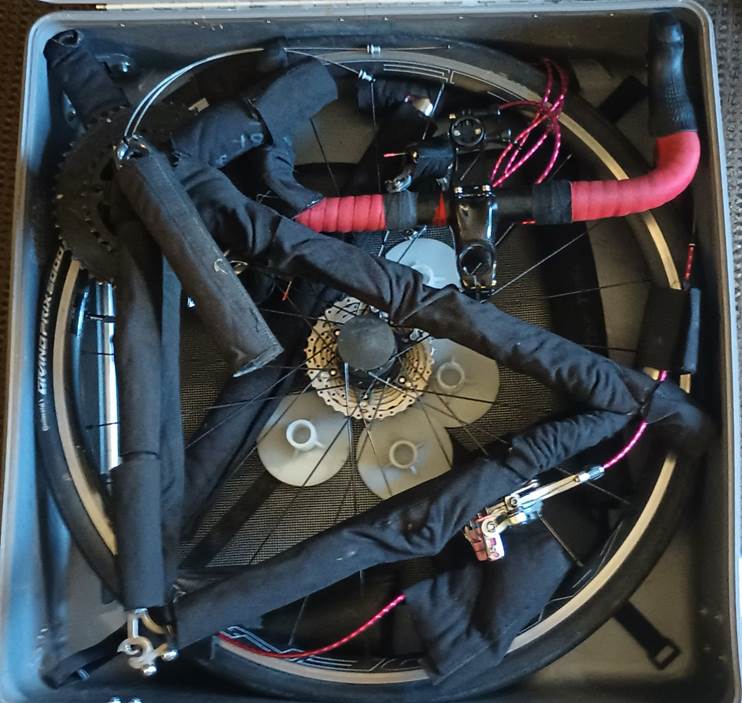
9. Step 9: Place the rear triangle in the case. The crank arm should extend into the corner of the case. Look for any metal-on-metal contact points and add Velcro padding as needed. The cables are routed wherever they easily fit. The rear derailleur is wrapped in Velcro padding (removed from the frame) and is also secured to the wheel so that it doesn’t move around during transport.
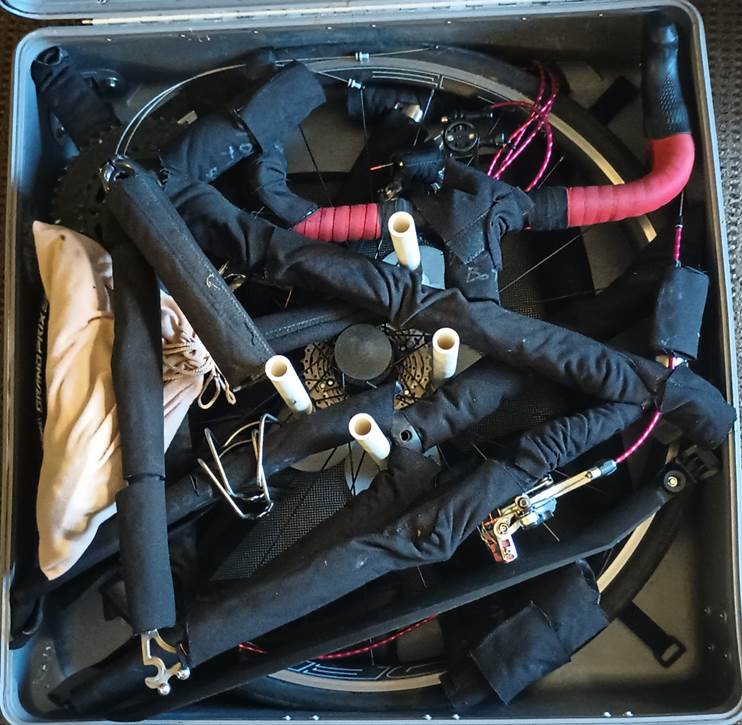
10. Step 10: Place the fork, saddle, temp fender (if using), and compression member stanchions into the case.
a. The fork gets placed first, with the steerer tube pointing to the right center of the case. The fork fits between the rear triangle members. The fork blades and the steerer tube are Velcro padded to protect them. The rear triangle helps keep it secure and protected.
b. The seatpost slides in above the axle on the wheel and inside the rear triangle chain stays. I cover my leather saddle (tan “bag”) to help keep it from getting greasy from the chainrings. The seatpost is also wrapped in padding.
c. The temp fender can be placed wherever it fits. This one is pretty large and fits nicely where shown.
d. I, then, place the vertical stanchions into the bottom compression member cups.
e. Bottle cages are placed in some empty location.
f. I normally also put my seat bag in the lower right corner of the case in the open triangular area. In this instance, my duffle bag had a ton of available space so I just put my saddle bag in there.

11. Step 11: Place the front wheel on top of everything and thread the stanchions thru the spokes. You will likely need to move the stanchions slightly to ensure they’re straight and that the front wheel is roughly centered over the case.
a. After the front wheel is in place, put the top cups (white disks) onto the stanchions to complete the compression members.
b. Place the top of the TSA cargo net over the wheel and connect each corner to the mating ear on the bottom net. Tighten all 4 Velcro straps so that everything is secure.
12. Step 12: Close the lid
a. This is, by far, the most challenging step. With my 28mm tires, this step was easy. With my 32mm tubeless tires, it’s very challenging. I need to slowly work each of the 3 contact points up into the lid as I close the lid over them. The 4th contact point is on the rear of the case and goes into the lid naturally as you close it.
b. I’ve traveled with this tubeless setup 4 times now. In 2 of the cases, I broke the bead loose on the front tire making it a bit more work to inflate when I reassembled the bike. Take note of this and make sure you have some way to inflate a tire when you get to your destination.
c. I carry an electric pump and spare sealant now so that I can top off prior to inflation.
13. Step 13: After all of that, here is what you get!
a. I carry a travel scale in my duffle bag so that I can ensure it weighs less than 50 pounds. This time it weighed 43 pounds. With my saddle bag and the tools and other stuff I pack in it, my fully closed case is usually 47-48 pounds.
b. The case is 26x26x10 inches and is an airline legal bag. On Southwest it flies free, always. On other airlines, it just another checked bag and is charged as such by the specific carrier.